Fashion
Does Cooking Your Concealer Really Work?

In my eyes, concealer is the makeup world’s gift to us who suffer from dark circles, blemishes, and overall “imperfections” we feel we need to fix. Most of us use this product to give us that even skin-tone that sometimes can’t solely be achieved with foundation or BB cream. Since I consider concealer to be one of my favorite products, I was ecstatic to learn that cooking my concealer could make it work even better.
"Cooking" your makeup might sound a little unusual, but the beauty world is weird and full of secrets (at least to me, it is). However, before you continue to panic with thoughts of stoves and ovens, I’ll quickly let you know that the cooking part simply implies the heat from our bodies. Basically, to cook concealer, you apply it to your face and let it sit for around 10-20 minutes before blending. This will let the concealer warm up, thicken, and (slightly) change color and texture. As a result, the concealer will blend better and create more coverage — who doesn’t want that?
Maybe this is old news to you and you’ve already been doing this in your makeup routine for ages (for which I applaud you for your patience), but for many of us, myself included, this is a fairly new beauty hack passed down by drag queen makeup experts. I decided the only way to really find out if cooking my concealer would actually make a difference was to try it out myself.
The Experiment
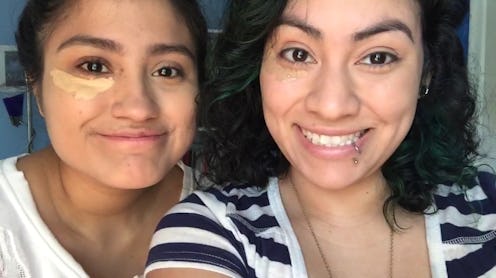
To find out if this beauty trick was actually life-changing, I decided to cook my concealer on the right side of my face while immediately blending on the left side; my cousin Marissa did the same with a different concealer product. This would let us compare which technique worked better for coverage and blending. This would also allow us to compare the two concealers to see if this technique worked on both our faces with different products.
Before beginning the timer, we followed our usual steps: primer, foundation, and a little eyebrow shading. Then, we applied the concealer on both sides under our eyes (in the usual amount that we would use), blending only on the left side. I used Collection’s Lasting Perfection Concealer, which (to my knowledge) can only be easily bought in the UK. However, Marissa used Maybelline’s Fit Me Concealer; she mixes two different shades and then blends them together to get the right color for under her eyes.
The Results
With all the steps done, we were left with waiting. For someone impatient, like myself, it would have felt extremely long if Marissa hadn’t been there to talk to and distract me from the slowly ticking clock. Granted, if you are doing this by yourself, you can still finish other parts of your makeup, style your hair, or get dressed. But, even then, 20 minutes is a long time.
Thankfully, it was worth the wait! After we both blended (in the same way we blended the other side), the results were obvious. The cooked side looked significantly better than the non-cooked side. At first, it was a bit harder to blend the concealer since it wasn’t as thin as when you first apply it to your face. However, as you kept blending, it eventually smooths onto the skin, while also creating better coverage than the other side. The color of the concealer also darkened a bit after "cooking" on our faces for 20 minutes. But once we both had blended it, it didn’t look as if it was the wrong shade.
The Verdict
Overall, I would say that cooking your concealer works wonders on coverage for under your eye (and probably anywhere else you wish to apply it). Comparing both sides let me see that I definitely created a much more even skin tone on the side that had been cooked, and my cousin Marissa totally agreed. Once I try this again, I'll practice more blending or different techniques to get the best result.
Still, regardless of how great this technique works, I’ll probably only do it for special occasions or when I have the time. As I’ve said before, I’m an impatient person who just wants things done as quickly as possible, so for an everyday look, I’ll probably skip the 20 minutes (maybe only waiting 5 or 10, at most).
Nevertheless, I’d like to take this moment to thank drag queens for always being one step ahead in the cosmetic game and for teaching the rest of the world their brilliant makeup tricks.
Images: Giphy (2); Personal photos and videos