Fashion
How To Acid Wash Your Jeans In 8 Simple Steps

This spring, there are many styles from the '80s and '90s that are back in action, amongst them, acid wash. And because DIY projects are always in season (probably because they're a fun and usually inexpensive way to achieve a look you really like) now's definitely the time to learn how to acid wash your jeans.
Since it's not completely "shorts season" everywhere (and hey, I generally still wear jeans in the summer anyway) I thought I'd try my hand at getting a pair of my jeans to have the acid wash effect without having to go out and buy another pair. Unfortunately, an actual acid wash pair I bought last year got too worn and had to be thrown out. So I found myself some denim that I wouldn't mind ruining (if I messed up, that is) and had a go at it.
It was super easy and turns out, I didn't mess up at all! In fact, I might do it all over again on the same pair of jeans to get an even better result. I realized I was a little conservative with the bleach in my attempt to be careful, but you don't have to be. Here's how you can take a plain pair of jeans and spice them up for a new look this season:
Step 1: Gather Your Materials
What you need: Bleach, a spray bottle, rubber bands, and, of course, your jeans.
I used some hair ties since I didn't have any rubber bands at home. I only needed four or five since I'm pretty short and didn't have a ton of denim to work with. It might also be handy to use rubber gloves if you have super sensitive skin. You won't be touching the bleach much, though, since you're using a spray bottle. Also, I suggest doing this project outside (better ventilation since you're working with a toxic chemical, and all) and preferably on a concrete slab. Spraying bleach near grass or plants will kill them.
Step 2: Wet Your Jeans
They shouldn't be soaking, but get them wet enough that they feel noticeably heavier. I used the outdoor faucet at the back of my house to run water over my jeans.
Step 3: Bustle Your Jeans In The Desired Areas
Using the rubber bands (or hair ties), gather the denim in a bunch and secure a band around it. It's very similar to tie-dyeing a t-shirt.
Step 4: Prepare The Spray Bottle
Fill your spray bottle with two parts water and one part bleach. You don't want to do half and half, because you can't be sure that the bleach won't eat through the denim.
Step 5: Spray The Bleach And Wait
I sprayed the top of my jeans as well as all around the places I had bustled thoroughly. Because you aren't dipping your jeans into a bucket, the spraying allows you to still have some places that will remain dark, giving you more of the acid wash look. I decided to leave the bottoms of the jean legs the way they were to create a sort of ombre effect, but you can do whatever you like. Set and alarm for anywhere between 30 minutes and a hour, depending on how bright you want your result. I let mine sit for just over an hour and went back and sprayed the jeans again halfway through.
Step 6: Turn Over And Repeat Process
Do the same thing to the back of your jeans. Or if you want to be unique, you can leave the backside and only show off the acid wash in the front. It's totally up to you! I left the bleach on the backside of my jeans for another hour, also spraying more bleach halfway through.
Step 7: Take Off The Bands And Run Through A Rinse Cycle
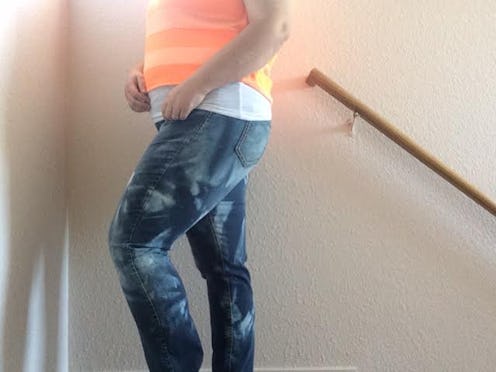
Once, you're satisfied with how much the bleach has set in, run your jeans through the rinse cycle in your washing machine. Before you actually wear your new jeans, you might want to let them go through a normal wash cycle as well (but don't put any other clothes in there with them or you'll bleach them, too!). Dry your jeans as you normally would, and there you have it! Here's how mine looked after drying:
Step 8: Enjoy Your New Pair Of Jeans
Like I said, I was still pretty conservative with my spraying, so I may actually go back and do even more bustles in higher and lower places on my pair to get a more bold acid wash look. The ideas are endless, as you could even create a stencil with a pattern and use the bleach to get the pattern on your denim. Have fun with it, and enjoy your new look!
Images: Author's Own