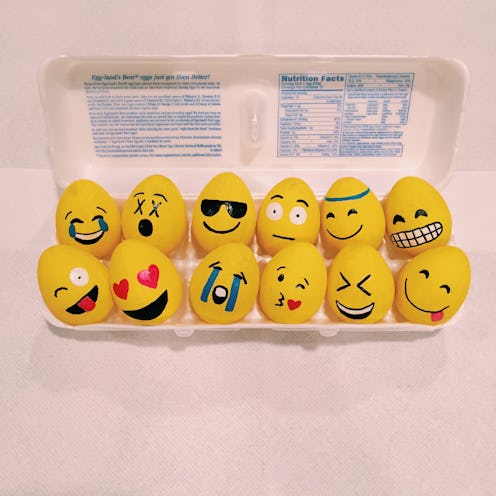
When it comes to Easter eggs, you probably think a couple things — one, that's kid stuff! Or two, hard-boiled eggs are gnarly, and dyeing them is a messy hassle that will turn my kitchen rainbow colors forever. False and double false! Decorating Easter eggs shouldn't end with your childhood, and these reusable emoji Easter eggs are the perfect alternative to traditional hand-dipped versions. Not only do these incorporate the universal language (emoji, duh), but using plastic eggs instead of the real guys means that these have a lifespan longer than a week in the fridge. Plus, they don't smell. While plastic eggs are typically used to hide candy and coins for eager little backyard hunters, they can also be used year-round to hold laundry quarters, little snacks, vitamins, or anything else that's tiny and needs a transportable home.
Whether you celebrate religiously or not, Easter is a great time to bring friends and family together and celebrate the arrival — finally — of spring. Preferably with some mimosas, decadent brunch foods, and lots and lots of jelly beans and Cadbury Creme Eggs. With just a bag of plastic Easter eggs and some paint pens, you can transform these cheap little containers into something way more fun (and totally Insta-worthy).
Here's What You'll Need
- Plastic Easter eggs
- Assorted paint pens — for these emojis, you'll need black, white, blue, and pink.
- A thin Sharpie (for extra precision)
- Heart stickers (for kissy face dude and heart eyes guy)
- Tape (to hold your eggs still while you work)
1. Sort your eggs
I know, we're pulling out the big guns. Get all your yellow eggs set aside and ready to go. You can get creative with the other colors, donate them, or stuff them for hiding if you have any little ones around.
Roll a little piece of tape, and stick your first egg to your work surface, back side down (i.e. so that the egg opens towards you). This is optional, but it makes drawing on a curved surface a little easier.
2. Paint your faces
Most of these are super simple. This guy is giving me the side-eye for breaking this down as much as I am. He knows you're smart enough to figure it out.
But some of these guys — like super cheesy grin dude — take two paint pens, and drawing on the white area first makes the process way easier. Make sure the white dries full (only a minute or so) before you go in with the black. Otherwise you could smudge your paint. If you do smudge, a little nail polish remover on a Q-tip will clean it right up. Now that you have your basic rules down, let's get the others going.
He's happy now, but just add a couple of your stickers...
...and he's in love! More specifically, he's in love with your DIY skills.
And love is cool. Except for the times when...
...it's so absurd it makes you cry. I bet you didn't know there was going to be a questionable narrative here.
But back to the task at hand! You are seriously an angel for getting your Easter crafts done in advance (or at all).
Love ya like XO.
OMG, OK. Just a few more.
He's so pumped for Easter chocolate. For some reason I assume all of these are boys. Should I talk to someone about that?
This guy just saw his IRL (actual egg) cousins get boiled and dyed. He is freaking the eff out until he realizes that he is a plastic egg and is therefore ensured a long and happy life.
He looks like this now. He's stoked.
Aww yeah, check it. You've got a whole dozen now.
One big happy family, ready to get stuffed with goodies or maybe even be displayed in a cute basket at brunch!
Images: Caroline Wurtzel; Jenna Wexler