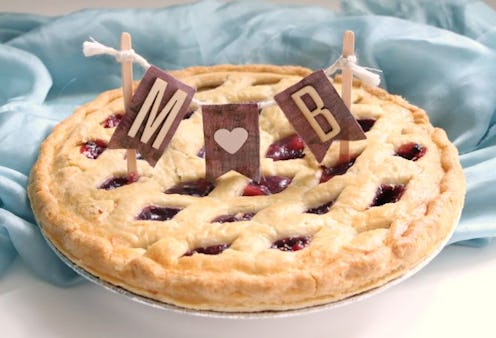
From weddings to graduations, June is a month of warm weather and celebrations. And if you’re planning on partying it up with some delicious desserts, why not make a DIY pie garland? This charming craft can be personalized to any celebration, theme, or holiday. It can also be used to decorate a cake... or pizza. Just saying.
The particular version featured in this tutorial is designed for a wedding pie. It features letters that represent names along with a sweet and simple heart. It’s a last-minute easy and inexpensive idea that would make an awesome addition to a rustic wedding. Plus, it’s a clever way to use up fabric scraps.
As always, feel free to adjust this idea to fit your requirements. Feel free to completely ditch the heart and use a combination of letters to spell out a phrase or word. Ideas include “congrats” for graduation parties or “summer” for the summer solstice. Names and dates for special festivities and birthdays also work perfectly.
Whatever you decide to use your garland topper for, I can guarantee that it will add a serious dose of charm to your party. For best results, coordinate your garland with other décor. Happy celebrating!
Supplies:
- Scrap fabric- Hot glue gun- Cotton cord or twine- Scissors- Heart punch and paper *- Wood letters *- Wood dowels or sticks
Materials such as cotton, denim, burlap, and faux leather work best for this project. These fabrics are sturdy enough to support embellishments and won't fray like crazy.
* These exact supplies aren't necessary. In place of a heart punch and paper, you can use a heart sticker or button. Don't have wood letters? Use stickers! The scrap book section of most craft stores have a huge variety of foam, metallic, and decorative letter stickers.
1. Cut three uniform-sized rectangles. They should be large enough to accommodate the letters that you will be using.
2. Fold each rectangle in half. Make a diagonal snip along the bottom edge. This will transform the fabric into a traditional garland flag shape.
3. Repeat with the remaining two pieces.
4. Punch out a heart from the scrap paper. If you're using a sticker, button, or another fun embellishment — skip to the next step!
5. Hot glue the letters and heart to the fabric pieces.
6. Tightly tie a wooden stick to each end of the cord. The length of the cord will depend on the number of mini flags. Double knot the cord to be safe! You can also add a dot of hot glue to the stick before tying the cord.
7. Add a thin line of hot glue to the back of each flag and adhere to the cord.
Pierce the sticks into the beloved pie or cake of your choice. Instant cuteness, am I right?
I can't stress how much you can personalize this little guy. From the fabric to the actual dessert that you're decorating, the possibilities are endless. Have fun with it!
Images: Kirsten Nunez/Bustle